
Have you ever felt lost on the course, not sure whether to lay up or put the ball to the back of green? Yardage books are vital for helping golfers understand the challenges a course presents, and how to play each hole.
Giving golfers the knowledge they need to be successful is essential for creating an incredible player experience, plus it makes your golf course look professional. Having a high-quality yardage book for sale (or as a complementary perk) makes an immediate impression that your golf course is serious about the sport.
- What is a yardage book?
- Create a yardage book with our guide
- Start with a real plan
- Yardage book size, fonts, and covers
- Develop a clear legend with easy to understand icons and colors
- Use a clear and consistent layout design
- Use technology to aid the design process
- Design each hole
- Outline accurate carry distances and yardages
- Design the green diagram
- Finalizing your yardage book design
- You can always go see the pros
Learn what to look for in a golf management system and how to easily make the switch with our complete guide.The Ultimate Guide To Switching Golf Management Software
What is a yardage book?
Yardage books are a handbook used by golfers when playing a round. These books contain information about distances, hazards, and green complexes for every hole on the golf course. Typically, yardage book offer a little bit more information than the average scorecard. Golfers use yardage books to develop a strategy for playing each hole, and they use the distances and hazards mapped in the yardage book to determine the optimal ball placement based on their level of skill.
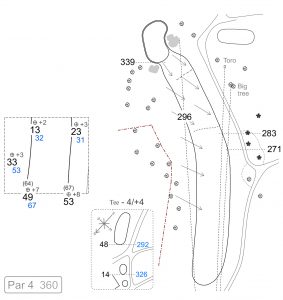
Create a yardage book with our guide
Creating a yardage book that is easy to understand and appealing to the eye is not a simple design task; there are many design principles at play. That’s why we put together a short guide full of best practices for designing the perfect yardage book.
We want to help you create a yardage book that is useful for your customers. So, let’s dive into some best practices to consider before setting out to create your very own yardage book.
1. Start with a real plan
You won’t get anywhere if you dive into the deep end on your own. Simply telling a designer to go and create a yardage book won’t work either.
To make a coherent, useful, and eye-catching yardage book, make sure you understand what the overall aesthetic, look, and feel of your yardage book will be before you start.
Get input from your golf professionals and other team members to ensure that they get a chance to provide feedback. They may have insights from past experiences, which could help you avoid mistakes.
2. Yardage book size, fonts, and covers
Yardage books are usually are similar in size to a 3.5 by 5.5-inch field notes pad. However, some yardage books might get as big a standard 8.5 by 11-inch note pad, especially if the course chooses to place large advertisements within.
Any font you choose should be readable and consistent with course branding. We recommend using two complementary fonts to help make different sections of the yardage book look distinct. For example, you may want to use one font for the titles of each page while using another font for any paragraphs with details about the hole itself.
The cover should complete the overall look and feel, it will need to be weather resistant and aesthetically aligned with the golf course’s brand. Leather covers are a great weather-resistant option and give a luxurious feel to your yardage book, especially if they are custom made. You can find many options for yardage book covers on Amazon or through custom manufacturers.
3. Develop a clear legend with easy to understand icons and colors
Designing a yardage book isn’t that different than designing a map. Except that everything on this map communicates some feature or aspect of the course to the golfer.
The icons you use should clearly illustrate what they represent and be consistent and uniform across the entire yardage book. You’ll need images and diagrams to represent the many features typically found on a golf course including:
- Tree lines
- Tee boxes
- Fall lines
- Rough
- Bunkers
- Water hazards
- Green and hole placement
- Boundaries
- Drop zones
- Lateral hazards
- False fronts
- Trees, rocks, and shrubs
- Cart paths
- Yardages
- Carry distances
- And more, be creative!
With so many variables to represent visually, it’s critical that you make you use a clear set of distinguishable icons. We recommend using colors to represent the different areas usually found on a golf course. For example, your yardage book could make use of dark green for the rough, white for out of bounds, orange for drop zones, blue for water hazards, and brown for sand traps.
4. Use a clear and consistent layout design
Typically a yardage book has one page for each hole, a front cover and a back cover. Sometimes there might also be a few pages with notes about the course or advertisements about the facility’s restaurant and pro shop.
For course operators, yardage books are an opportunity to generate revenue both with ad placements and sales of the yardage book itself in the pro shop. Just make sure any advertisements placed in the book don’t overwhelm or distract from the important content.
Each page in a yardage book usually features three key areas:
- The hole overview map
- The green map
- Notes about the hole itself.
The hole overview should give the player an idea of the overall shape, look and feel of the fairway, boundaries, and pin location. It will tell the golfer where to put the ball from each tee box and how to plan each shot. A good yardage book will feature carry distances for several points on the fairway so players can make shots based on their driving distances.
The green map should ideally have a grid that reflects yardage and includes fall lines to show where players can expect a shot to break. If there are standard hole placements that your courses uses, you may consider representing potential hole locations with a flag on the green map.
A notes section for each hole is also handy for conveying details relating to yardages for each tee box, difficulty, slope, and rating. Also, consider leaving space for the players to input their notes and comments for each hole.
5. Use technology to aid the design process
If you want your yardage book to look professional, don’t use PowerPoint or Word. You need something that gives you flexibility and can perform some complicated tasks. Programs like Photoshop or Sketch are design tools that professionals designers use every day, and their price is well worth it if you want to create something truly professional.
You can get a free trial of Photoshop at their website. Gimp and Canva are also excellent free options for design tools if you’re on a budget.
Once you have a design tool and know your way around it a little bit, it’s time to get started with building your very own yardage. To make your life easier we’ve created a blank starter template, that comes complete with icons, and proper sizes you can easily take to the print shop once you are finished.
6. Design each hole
Once your blank yardage book template is set up in your design suite, it’s time to start putting your yardage book together.
Ideally, what you need is an aerial picture of each hole, so you can accurately map out each layout. You don’t need a drone camera to do this, although it could help! We recommend you head over to Google Maps or download the Google Earth desktop app and find your golf course.
Google has put a remarkable amount of work into developing high-quality satellite imagery, so you should be able to find a quality image of your golf course that isn’t grainy. Once you find your golf course screenshot your web browser and transfer the image to your design editor, here, you can cut out the golf course and blend it cleanly onto the yardage book page.
How to make a yardage book using Google Earth:
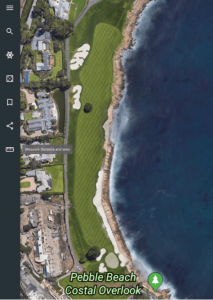
Google Earth is handy for quickly and accurately determining yardage distances. Measure distances by clicking the ruler icon in the left-hand menu and map your yardages. Once you know distances to critical points on the fairway and green, take a screenshot or mark the distance in your design mockup.
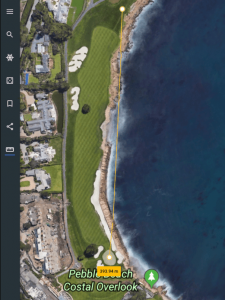
This YouTube video does an excellent job of demonstrating how to use Google Earth images in Photoshop. Note how he uses the cut tool to cut way the image of the golf course and paste directly onto his yardage book template.
Alternatively, if you know the layout of your holes very well, you can draw out the shape of the hole in a design software suite and put icons to illustrate course features.
7. Outline accurate carry distances and yardages
One of the most critical pieces of information a yardage book can offer is well… yardages! Unfortunately, courses overlook this, instead they only put in a few distances. The book might tell you how far from the tee box to hole, but what golfers are looking for is yardages to multiple points on the fairway and the width and depth of the green.
Providing a lot of distance measurements tells golfers about where to hit the ball. For example, golfers with shorter or longer driving distances may reference these numbers when deciding where to place the ball on the fairway or green.
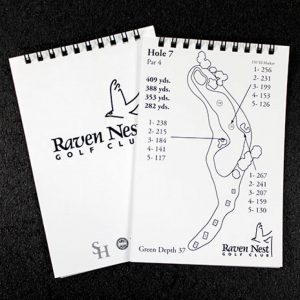
Yes, there is rangefinder technology out there that can do the same job. However, there is something to be said for the manual use of pen and paper, especially when a yardage book contains details that a golfer may not have considered. Plus, yardage books show distances much quicker than rangefinders that sometimes take a while to actually calculate the distance.
8. Design the green diagram
Each hole page should get a diagram zoomed into the green. The goal of this diagram is to give golfers a good idea of where to expect the ball to break, how far each putt will be and where to place the ball during the approach.
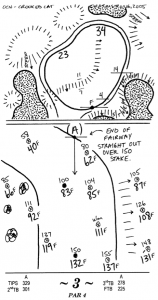
The diagram of the green should come with a grid that accurately reflects the yardage of the green itself and fall lines to indicate where the ball will break once struck. Consult your pros and for their opinion on the features of each green to get the most accurate picture of the green’s layout.
Finalizing your yardage book design
Once the design for each hole is complete with icons, boundaries, and hazard markers, you’re nearly finished! To finalize your yardage book design, consider adding a small legend at the beginning to explain what each icon mean as well as a front page with course branding and even a short paragraph with course history or a note from the club president.
Now that your yardage book is complete, it’s time to head to the print shop. Make sure to save your design file with at least 300 DPI and with CMYB printing colors, not RGB for digital screens. You should be able to configure these settings when saving your file.
We hope that after reading this are prepared to create your very own yardage book.
You can always go see the pros
We know how hectic a golf course can get; with so many golfers walking through your door every day, it’s hard to take the time to sit down and design your yardage books. And let’s be honest, not everyone is born with design skills; even after hours of trial and error, the design might not turn out that great. Companies like Best Approach now offer digital versions of the traditional yardage books. Your customers will now be able to access it directly from their phone, anywhere on the course.
While having a strong yardage book is an important part of your facility’s golfing experience, having a powerful management system is the best way to ensure customer satisfaction. Talk to one of our experts today to find out how Lightspeed Golf can help you simplify day-to-day operations.

News you care about. Tips you can use.
Everything your business needs to grow, delivered straight to your inbox.


